How to Use the BotDetect SharePoint CAPTCHA Feature in SharePoint 2016
Unlike Recaptcha the Stalker -- BotDetect CAPTCHA works in China! Licensable source-code; self-hosted -- doesn't stalk -- nor does it slurp your form-data! Think: GDPR & LGPD!
- Install the BotDetect SharePoint Captcha feature on your SharePoint 2016 farm
- Protect your SharePoint 2016 list with the SP2016 BotDetect field
Install the BotDetect SharePoint CAPTCHA Feature on Your SharePoint 2016 Farm
The BotDetect SharePoint CAPTCHA Feature solution is deployed to a SharePoint server using SharePoint Management Shell as a solution package (.wsp) file.
- Download the zip with BotDetect.SharePoint2016.wsp file to your SharePoint 2016 server.
- Start the SharePoint 2016 Management Shell on your SharePoint 2016 server (Start → All Programs → Microsoft SharePoint 2016 Products → SharePoint 2016 Management Shell)
-
Type in the following command to add the solution to SharePoint (use the path to the location where you saved the .wsp file in step 1):
Add-SPSolution -LiteralPath "C:\BotDetect.SharePoint2016.wsp"
-
Type in the following command to deploy the solution to your web applications:
Install-SPSolution -Identity "BotDetect.SharePoint2016.wsp" -GACDeployment
    -FullTrustBinDeployment
Important: The
FullTrustBinDeploymentswitch is necessary because BotDetect feature needs to deploy its own assembly to the GAC. If you do not add this switch, you will receive an error message and you will not be able to use BotDetect in your SharePoint environment. This is a new switch used in SharePoint 2016.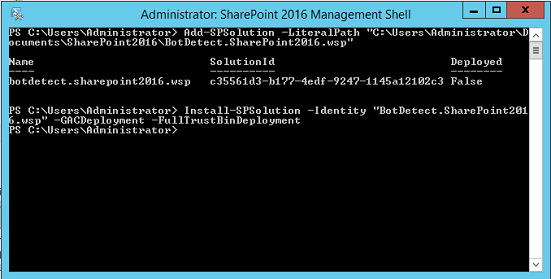
- Navigate to Central Administration → Application Management → Manage web applications and select the web application in which you want to use the BotDetect SharePoint 2016 solution. From the ribbon select the Manage features option. In the Manage Web Applications Features dialog activate the SharePoint 2016 BotDetect Web Application Feature.
Note: Activating the SharePoint 2016 BotDetect Web Application Feature will automatically make necessary configuration changes in web.config of the application to support the BotDetect Captcha control.
Protect Your SharePoint 2016 List with the SP2016 BotDetect Field
After you deploy the BotDetect SharePoint 2016 solution to your web application, the SP2016 BotDetect Field will become available for your SharePoint lists and libraries. Before you are able to use the SP2016 BotDetect Field in your lists and libraries you are required to activate the SharePoint 2016 BotDetect Site Feature in the site collection where you plan to use it.
Activate the SharePoint 2016 BotDetect Site Feature
To activate this feature follow these steps:
-
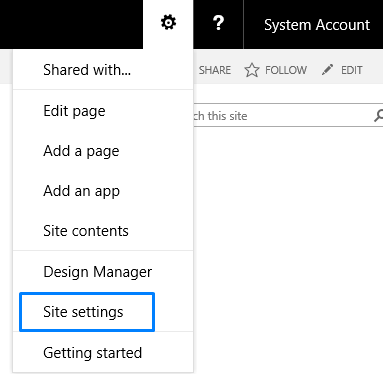
Select Site Actions → Site settings in the root site of your site collection
-
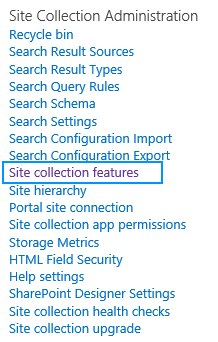
In the Site settings page, under Site Collection Administration select the Site collection features option
-
In the Site Collection features page, find and activate the SharePoint 2016 BotDetect Site Feature

Add the SP2016 BotDetect Field to a SharePoint List
Once you have activated the SharePoint 2016 BotDetect Site Feature you can use the SP2016 BotDetect Field in your SharePoint lists.
To add the BotDetect Field you will use the same approach as for adding other SharePoint fields.
- Navigate to the list to which you wish to add the BotDetect Field
-
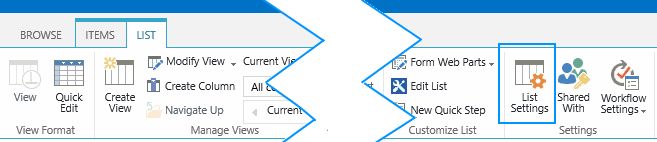
From the ribbon select the List settings option
-
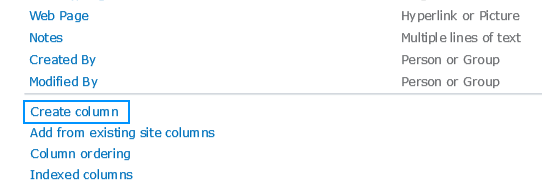
In the List settings page, under the Columns section, click Create Column
-
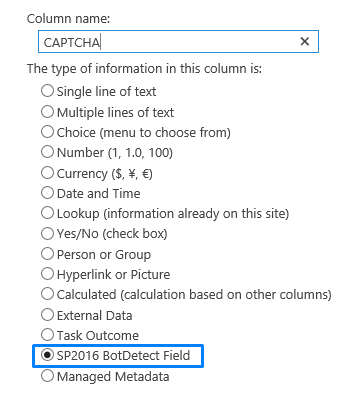
In the Create Column page simply select SP2016 BotDetect Field and enter a name. It is recommended to uncheck the Add to default view option, since this field is only relevant for Add and Edit forms.
Important: In case that you did not activate the SharePoint 2016 BotDetect Site Feature, the BotDetect field will display a warning message on your forms.

In case this happens, please follow the instructions to activate the SharePoint 2016 BotDetect Site Feature.
BotDetect SharePoint CAPTCHA Feature and Sandbox SharePoint Solutions
Note: BotDetect SharePoint CAPTCHA Feature solution is a farm-level solution. As of SharePoint 2016, sandbox solutions are considered deprecated and as such are not supported by the BotDetect SharePoint CAPTCHA Feature.
Current BotDetect Versions
-
BotDetect ASP.NET CAPTCHA
2019-07-22v4.4.2 -
BotDetect Java CAPTCHA
2019-07-22v4.0.Beta3.7 -
BotDetect PHP CAPTCHA
2019-07-22v4.2.5


